
Arduino สแกน I2C Adress

Arduino สแกน I2C Address

        สำหรับบทความนี้จะเป็นบทความที่เกี่ยวข้องกับการเชื่อมต่อผ่านพอร์ทอนุกรม I2C (I2C-Busของบอร์ด Arduino  เนื่องจากเวลาเขียนโปรเเกรมที่เกี่ยวข้องกับอุปกรณ์ I2C อาจจะเกิดการไม่ตอบสนองของอุปกรณ์ ทำให้ไม่สามารถรู้ได้ว่าเกิดปัญหาที่ตัวอุปกรณ์ การต่อสาย หรือ เขียนโปรเเกรมผิดพลาด

ข้อดีของการเเสกน I2C Scanner
  • ตรวจสอบว่าอุปกรณ์ I2C นั้นมี Address อะไร
  • สามารถระบุได้ว่าอุปกรณ์ I2C นั้น ตอบสนองกับบอร์ดหรือไม่
*ถ้าอุปกรณ์ตอบสนองเเละเเสดง Adress ของอุปกรณ์ แสดงว่าอุปกรณ์นั้นผ่านการทดสอบเบื้องต้น สามารถนำไปเขียนโปรเเกรมใช้งานกับบอร์ด Arduino ได้
* ถ้าอุปกรณ์ไม่ตอบสนอง ลองเช็คสาย SDA หรือ SCL ว่าต่อสลับกันหรือไม่ ถ้าต่อถูกสายถูกเเล้ว เเละอุปกรณ์ไม่เเสดง Adress อุปกรณ์อาจมีปัญหา

ตัวอย่างโปรเเกรมที่ใช้

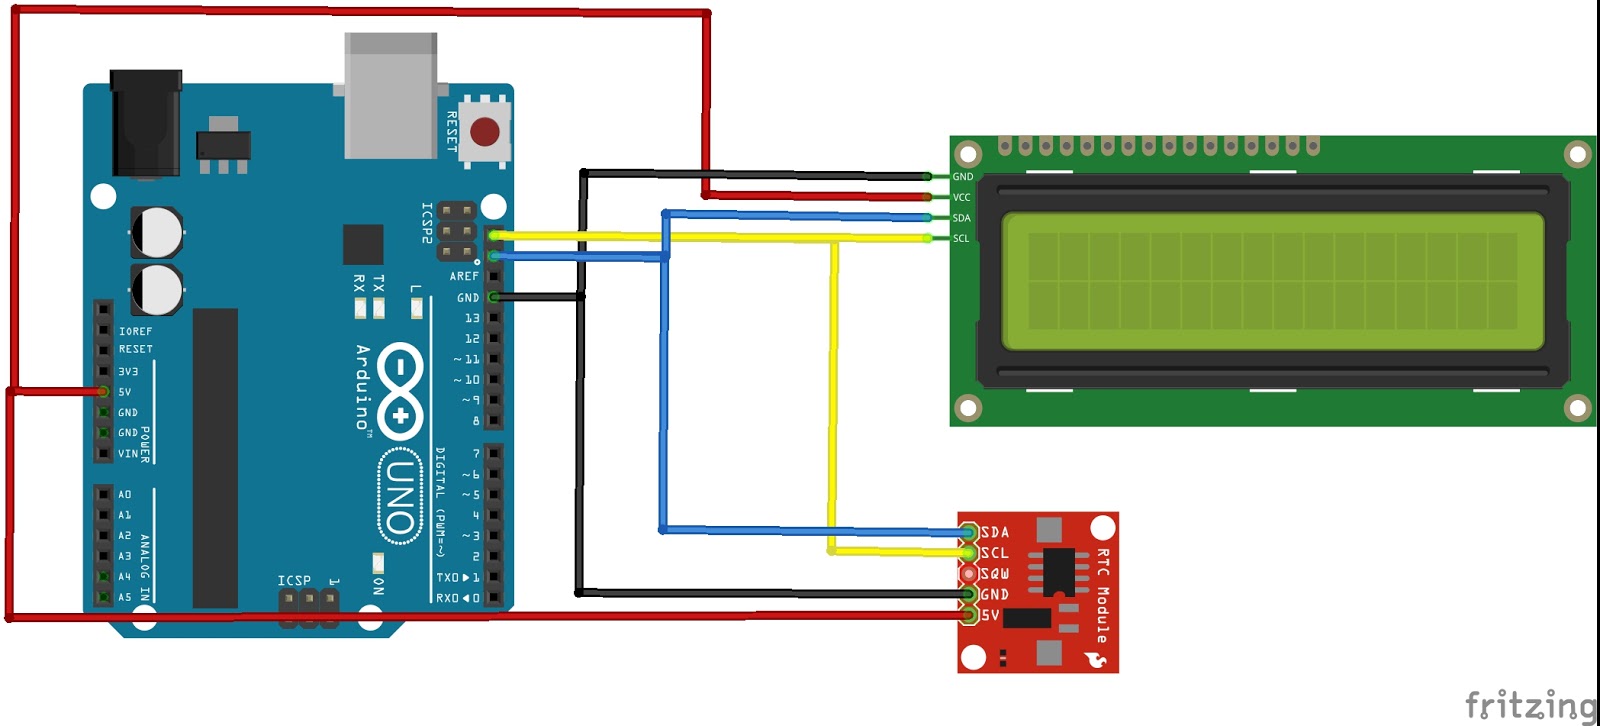
ตัวอย่างวงจรที่ใช้ Real Time Clock (DS1307) และ 16x2 LCD I2C 

ผลลัพธ์ของการรันโปรเเกรม
Referent 
   - https://playground.arduino.cc/Main/I2cScanner

Comments

Popular posts from this blog

Arduino กับการใช้งาน Serial Monitor

Arduino กับการใช้งาน Serial Monitor Serial Monitor คือ ส่วนหนึ่งของโปรแกรม Arduino IDE สามารถใช้งานได้ 2 อย่าง คือ - แสดงผลลัพธ์จากบอร์ด Arduino - ใช้รับข้อมูลจากผู้ใช้ แล้วส่งข้อมูลไปยังบอร์ด Arduino รูปแบบการใช้งาน Serial Monitor เริ่มต้นใช้งาน void setup() {    Serial.begin(9600); } แสดงผลออกทาง Serial Monitor Serial.print("Hello World");       /* แสดงคำว่า Hello World */ Serial.println("Hello World");     /* แสดงคำว่า Hello World และขึ้นบรรทัดใหม่ */   อ่านค่าจาก Serial Monitor Serial.read(); วิธีเปิด Serial Monitor 1. กด Ctrl + Shift + M 2. กด Icon ตัวอย่างการแสดงผลลัพธ์จากบอร์ด Arduino แสดงผลลัพธ์จากบอร์ด Arduino ตัวอย่างการรับค่าจาก Serial Monitor - ส่ง 1 เพื่อ On LED -  ส่ง 0 เพื่อ Off LED แสดงผลลัพธ์การรับค่าจาก Serial Monitor * ถ้าไม่สำเร็จ ตรวจสอบว่าเลือก No line ending และบอดเรทเป็น 9600 เเล้วหรือยัง

Arduino - LCD (Liquid Crystal Display)

Arduino - LCD (Liquid Crystal Display) This article will give you an example of how to use Arduino board with 16x2 Liquid Crystal LCD (16 characters in 2 lines). Examples applications, Arduino boards send text or output from sensor to show on LCD screen. LCD pin LCD RS pin       to digital pin 12 LCD Enable pin to digital pin 11 LCD D4 pin       to digital pin 5 LCD D5 pin       to digital pin 4 LCD D6 pin       to digital pin 3 LCD D7 pin       to digital pin 2 LCD Vo pin       to Output from potentiometer 10k Ohm for adjust the contrast of the character. LCD Anode       to resistor 220 Ohm for power the backlight of the display LCD Cathode    to GND Example Program #include <LiquidCrystal.h> const int rs = 12, en = 11, d4 = 5, d5 = 4, d6 = 3, d7 = 2; LiquidCrystal lcd(rs, en, d4, d5, d...