
How to setup Arduino IDE?

How to Installing Arduino IDE?

Arduino IDE
What is Arduino IDE?
        Arduino IDE (Integrated Development Environment) is a software for Development Program on Arduino Platform. Such ass Text Editor, Compiler, Boot loader, etc. You can easily upload your code onto the board in just a few steps.


Installing Arduino IDE
  1. Open your Internet Browser and go to https://www.arduino.cc/en/Main/Software
  2. Select your operating system.
  3. Select JUST DOWNLOAD
  4. Double click arduino.exe to install.
    
    
  5. Select I Agree
                                 
  6. Select Option and Next>
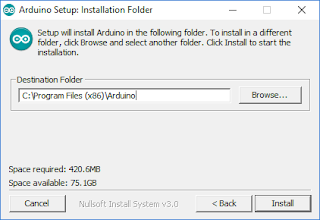
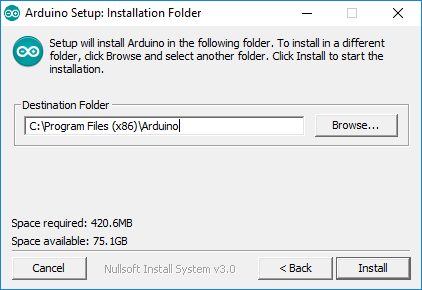
  7. Select the folder location to install the Arduino IDE. and Install
  8. Wait until the installation is complete. (In this step, Program will be asked to install the board driver. Select Install)

  9. open Arduino.exe and test compile

Comments

Popular posts from this blog

Arduino กับการใช้งาน Serial Monitor

Arduino กับการใช้งาน Serial Monitor Serial Monitor คือ ส่วนหนึ่งของโปรแกรม Arduino IDE สามารถใช้งานได้ 2 อย่าง คือ - แสดงผลลัพธ์จากบอร์ด Arduino - ใช้รับข้อมูลจากผู้ใช้ แล้วส่งข้อมูลไปยังบอร์ด Arduino รูปแบบการใช้งาน Serial Monitor เริ่มต้นใช้งาน void setup() {    Serial.begin(9600); } แสดงผลออกทาง Serial Monitor Serial.print("Hello World");       /* แสดงคำว่า Hello World */ Serial.println("Hello World");     /* แสดงคำว่า Hello World และขึ้นบรรทัดใหม่ */   อ่านค่าจาก Serial Monitor Serial.read(); วิธีเปิด Serial Monitor 1. กด Ctrl + Shift + M 2. กด Icon ตัวอย่างการแสดงผลลัพธ์จากบอร์ด Arduino แสดงผลลัพธ์จากบอร์ด Arduino ตัวอย่างการรับค่าจาก Serial Monitor - ส่ง 1 เพื่อ On LED -  ส่ง 0 เพื่อ Off LED แสดงผลลัพธ์การรับค่าจาก Serial Monitor * ถ้าไม่สำเร็จ ตรวจสอบว่าเลือก No line ending และบอดเรทเป็น 9600 เเล้วหรือยัง

Arduino กับการใช้งานจอ LCD (Liquid Crystal Display)

Arduino กับการใช้งานจอ LCD (Liquid Crystal Display)         ในบทความนี้จะเป็นตัวอย่างการใช้งานบอร์ด Arduino กับจอ LCD แบบ Liquid Crystal ขนาด 16x2 ( 16 ตัวอักษร 2 บรรทัด) โดยให้บอร์ด Arduino ส่งข้อมูลต่างๆ เช่น ข้อความ หรือ ค่าเอาต์พุตจากเซ็นเซอร์ เพื่อเเสดงผลยังหน้าจอ LCD ขาต่างๆของจอ การเชื่อมต่อระหว่างจอ LCD และบอร์ด Arduino LCD RS pin       to digital pin 12 LCD Enable pin to digital pin 11 LCD D4 pin       to digital pin 5 LCD D5 pin       to digital pin 4 LCD D6 pin       to digital pin 3 LCD D7 pin       to digital pin 2 LCD Vo pin       to เอาต์พุตจากตัวต้านทานปรับค่าได้ขนาด 10k โอห์ม เพื่อใช้ในการปรับความคมชัดของตัวอักษร  LCD Anode       to ตัวต้านทาน 220 โอห์ม เพื่อใช้ในการเปิดปิดเเบล็คไลท์ของจอ LCD Cathode    to GND ตัวอย่างโปรเเกรมที่ใช้ #include <LiquidCryst...