
การติดตั้งโปรแกรม Arduino IDE

การติดตั้งโปรแกรม Arduino IDE

Arduino IDE
Arduino IDE คืออะไร
        Arduino IDE (Integrated Development Environment) คือโปรแกรมที่รวบรวมเครื่องมือที่ใช้ในการพัฒนาโปรแกรมบนแพลตฟอร์ม Arduino อาทิเช่น เท็กซ์อีดิเตอร์ คอมไพลเลอร์ บูตโหลดเดอร์ เป็นต้น และยังสามารถอัพโหลดโปรแกรมที่พัฒนาสำเร็จเเล้วลงบนตัวบอร์ดได้ง่ายในเพียงแค่ไม่กี่ขั้นตอน สำหรับโปรแกรม Arduino IDE จะใช้ภาษา C/C++ ในการพัฒนาโปรแกรม ผู้ใช้ที่สนใจในตัวบอร์ดสามารถศึกษาโครงสร้างการเขียนโปรเเกรมได้จากในภาษา C/C++
ขั้นตอนการติดตั้งโปรแกรม Arduino IDE
  1. เปิดอินเทอร์เน็ตบราวด์เซอร์เข้าไปที่ https://www.arduino.cc/en/Main/Software
  2. เลือกระบบปฏิบัติการของคอมพิวเตอร์ตนเอง 
  3. เลือก JUST DOWNLOAD (ถ้าต้องการสนับสนุนผู้พัฒนาโปรแกรมสามารถบริจาคเงินได้) 

  4. หลังจากดาวโหลดโปรแกรมสำเร็จ ดับเบิ้ลคลิกโปรเเกรม arduino.exe เพื่อติดตั้งโปรแกรม
  5. เลือก I Agree เพื่อยอมรับเงื่อนไขการพัฒนา

  6. เลือกตัวเลือกต่างๆสำหรับการติดตั้ง จากนั้นกด Next>
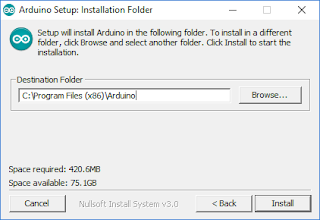
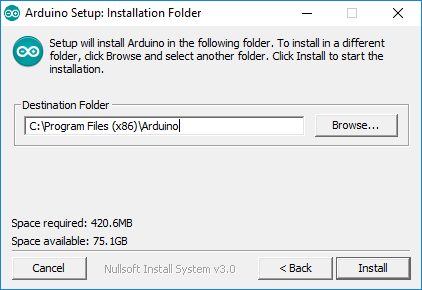
  7. เลือกตำแหน่งของโฟลเดอร์ที่จะติดตั้งโปรแกรม Arduino IDE จากนั้นกด Install

  8. รอจนสำเร็จ (ในขั้นตอนนี้จะมีสอบถามการติดตั้งไดร์ฟเวอร์ของบอร์ด กด Install)
  9. เปิดโปรแกรมแล้วทดสอบ compile

    สำหรับการติดตั้งโปรแกรม Arduino IDE มีขั้นตอนง่ายๆเพียงเท่านี้ครับ ขอให้ผู้ที่สนใจพัฒนาโปรแกรมบน Arduino IDE สนุกกับการเขียนโปรแกรมนะภาษา C/C++ นะครับ

Comments

Popular posts from this blog

Arduino กับการใช้งาน Serial Monitor

Arduino กับการใช้งาน Serial Monitor Serial Monitor คือ ส่วนหนึ่งของโปรแกรม Arduino IDE สามารถใช้งานได้ 2 อย่าง คือ - แสดงผลลัพธ์จากบอร์ด Arduino - ใช้รับข้อมูลจากผู้ใช้ แล้วส่งข้อมูลไปยังบอร์ด Arduino รูปแบบการใช้งาน Serial Monitor เริ่มต้นใช้งาน void setup() {    Serial.begin(9600); } แสดงผลออกทาง Serial Monitor Serial.print("Hello World");       /* แสดงคำว่า Hello World */ Serial.println("Hello World");     /* แสดงคำว่า Hello World และขึ้นบรรทัดใหม่ */   อ่านค่าจาก Serial Monitor Serial.read(); วิธีเปิด Serial Monitor 1. กด Ctrl + Shift + M 2. กด Icon ตัวอย่างการแสดงผลลัพธ์จากบอร์ด Arduino แสดงผลลัพธ์จากบอร์ด Arduino ตัวอย่างการรับค่าจาก Serial Monitor - ส่ง 1 เพื่อ On LED -  ส่ง 0 เพื่อ Off LED แสดงผลลัพธ์การรับค่าจาก Serial Monitor * ถ้าไม่สำเร็จ ตรวจสอบว่าเลือก No line ending และบอดเรทเป็น 9600 เเล้วหรือยัง

Why ADC value of the Arduino is 0-1023?

Why ADC value of  the Arduino is 0-1023? Analog Signal In this article, it will be explained that why Arduino board reads the ADC value (0-5V) is 0 - 1023. (see more  Arduino - AnalogRead ) Because IC chip of Arduino Board (Uno, leonardo, Mega2560, etc.). Can read ADC values up to 10 bits or 2 ^ 10 = 1024*  So the analog value on the Arduino board is 0 - 1023 (no unit). For some Arduino boards, such as Due, M0, MRK1X00, etc., the ADC (0-3.3V) can be read in 12 bit or 2 ^ 12 = 4096 level (resolution is 8,10,12 bits. See more ) ADC from Voltmeter vs. Arduino Board (10 bit) Comparison table with ADC (10 bits) After understanding the comparison. You can use the Arduino board to read the ADC values and write a program to compare ADC value to voltage. see more  Arduino - Analog Read Voltage  To apply for Other Applications.